
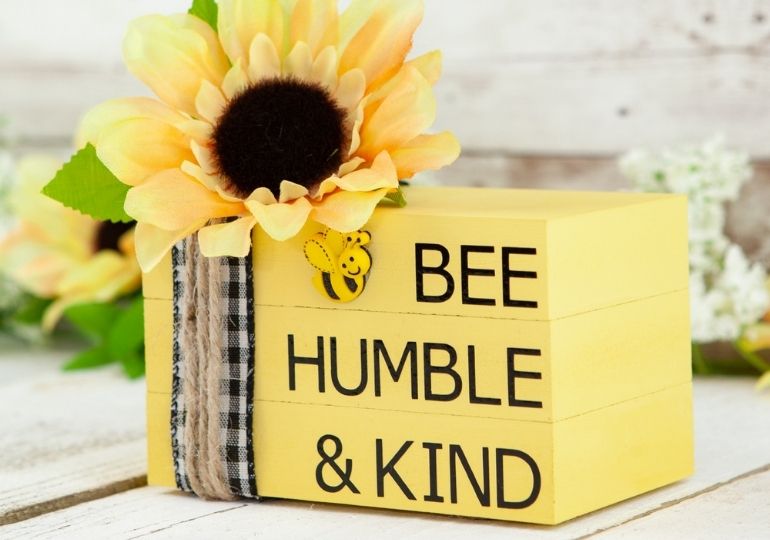
This honey bee decor piece is the perfect cricut craft. A bee themed stacked books set that makes for a great gift or cricut decor craft to showcase in your home. This be kind craft is very easy to make, festive, and a nice pop of yellow.
This DIY painted books decor piece is a fun lighthearted svg file craft. Head to your craft room and whip up these bee DIY craft.
Why Make This Stacked Book Decor…
- Simple Supplies
- Free SVG File for Craft
- Cute Bee Craft
- Stacked Booked DIY Project
- Affordable
- Makes a great gift or home decoration
- DIY Home project
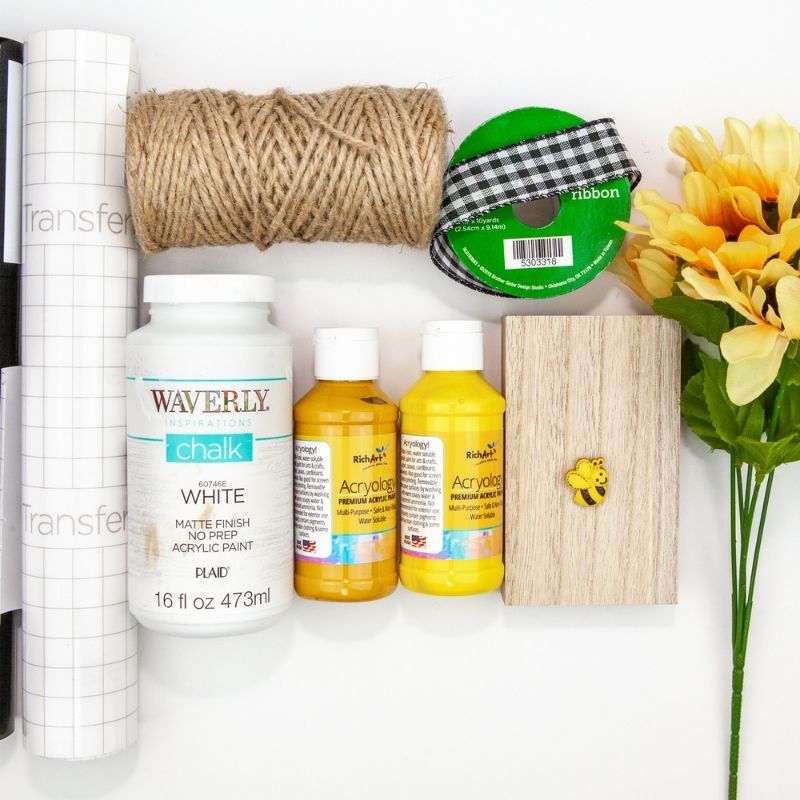
Supplies Needed
- Bee Button
- Cricut Transfer Tape
- Cricut Black Permanent Vinyl
- Sunflower Pick
- Jute String
- 1″ Wired Buffalo Check Ribbon
- 3 Wooden blocks or old books
- Yellow Acrylic Paint
- White Chalk Paint
Tools Needed
- Sponge Paint Brush
- Hot Glue Gun (can substitute with E6000 Glue)
- Silicone Finger Tips
- Wire Cutters
- Cricut Machine
- Cricut Blue Mat
- Scissors
- Cricut Vinyl Weeding Tool
- Cricut Scraper / Burnishing Tool
How to Make
Full directions for this craft project are in the printable How-To below. This is a quick overview of the craft.

Step 1: Start by painting your books yellow. I mixed some of the white chalk paint with the yellow paint until it reaches the desired color you want.
Step 2: Allow the paint to dry on each of the blocks. Then you use will hot glue to adhere all the blocks together.
Step 3: Now using your Cricut open the Cricut Design Space. Write the Words: Bee, Humble, & Kind. I used Verdena font, and then you will size the words to fit the size of wood you are using.
Step 4: Line up the words as you would like on the stacked books. I add a binding box around the words using the Square Shape Tool. Then move the box layer underneath the word layers, and resize the box shape to fit close to the words. That way you don’t waste excess vinyl.
Step 5: Cut the wording with your Cricut machine. Place the Blue LightGrip Mat and push the “Load” button and the machine. Set the dial to vinyl, and use the fine point blade.
Click make it button on design spice. Then prepare the screen will and move the print where you would like on your cutting mat.
Step 6: Click continue and push cut. Then eject once the Cricut cuts out the words.
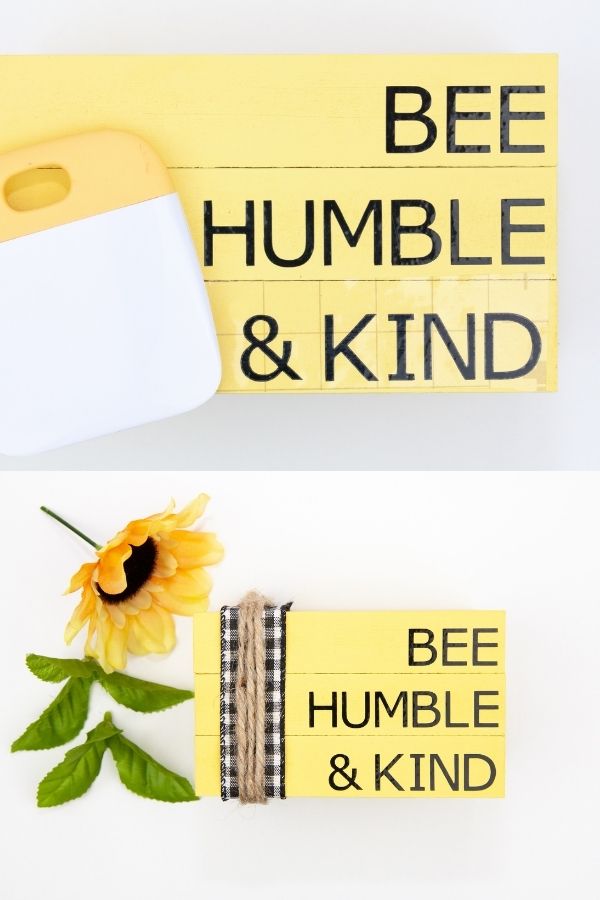
Step 7: Weed the vinyl, and then use transfer tape to press the vinyl onto the pieces of wood.
Step 8: Wrap the buffalo check ribbon around the blocks, and use hot glue to stick it to the wood. Then wrap jute string three times around the wood blocks!
Step 9: Snip one of the sunflowers from a flower pick, and place and add the bee button on the wood

Expert Tips And Variations
- Change the color of the wood if you would like.
- Make sure to allow the paint to dry before applying vinyl.
- You can use a Silhoutte machine as well for cutting the vinyl.
- If you do not own a Cricut, you can use stickers to place on, or paint the words on the wood.
- Use a different font for your words.
- Feel free to change up the flower on the DIY wooden book craft.
Interested In More DIY Projects
Connect with me on Facebook for more DIY Crafts, Home Decor, and more. As well as Pinterest!
Honey Bee Decor Cricut Craft

Check out this Honey Bee Decor Cricut Craft that you can make with wood and a Cricut machine. This is a fun and creative bee craft to showcase in your home, gift a loved one and more.
Materials
Tools
- Sponge Paint Brush
- Hot Glue Gun (can substitute with E6000 Glue)
- Silicone Finger Tips
- Wire Cutters
- Cricut Machine
- Cricut Blue Mat
- Scissors
- Cricut Vinyl Weeding Tool
- Cricut Scraper / Burnishing Tool
Instructions
- Paint wood blocks with desired color of yellow. I mixed White Chalk Paint and the two yellow acrylic paints together in a small disposable plastic food storage container.
- Start with a large dollop of White Chalk Paint and add the dark and light yellow paints a little at a time. Stir the yellow paint into the white paint until desired color is achieved.
- Use a sponge paint brush to paint the wood blocks. It isn’t necessary to paint the areas that will be glued together, but you can if you want to.
- Use Hot Glue to adhere the blocks together. Make sure to line the blocks up quickly before the glue sets, which should take less than a minute.
- Create the wording for your stacked books.
- Make 3 separate Text Boxes in Cricut Design Space, one text box for each word. Type one word in each Text Box. Choose desired font for each word. Re-size the font to less than 1 inch to insure each word will fit on side of the wood blocks. I chose Verdana font at size 60px.
- Line up the words as you want them to look on your stacked books. Add a binding box around the words using the Square Shape Tool. Move the box layer underneath all the word layers. Resize the box shape to fit close to the words so not to waste vinyl. Attach all layers together.
- Cut the wording using your Cricut Machine.
- Lay out the permanent black vinyl on a Blue LightGrip Mat and push the “Load” button on your machine. Set your machine dial to “Vinyl” and use a fine-point blade.
- Click the “Make It” button in Design Space. The “Prepare” Screen will appear and you can move your design to the desired place on your cutting mat.
- Click the “Continue” button at the bottom of the screen.
- Push the “Cut” button on your machine.
- Once the design is cut, push the “Load” button again to eject the mat.
- Weed the vinyl around the words using a weeding tool.
- Cut 3 strips of transfer tape, slightly larger than each word. Remove the backing from one of the Transfer Tape strips and place over one word. Use the burnishing tool to adhere the vinyl to the transfer tape. Follow the same process for the other 2 words.
- Line up the words on the sides of your wood blocks. Use the burnishing tool to rub the vinyl on to the wood. Remove the transfer tape slowly, leaving the vinyl on the wood.
- Wrap the Buffalo Check ribbon around the wood blocks. Start and finish the ribbon ends on the top of the wood blocks. Use hot glue to adhere the ribbon. This is a good time to use silicon finger tips because the hot glue will seep through the ribbon and on to your fingers.
- Wrap the Jute string three times around the wood blocks aligning it in the center of the ribbon. Again, start and finish the string on the top of the wood blocks and use hot glue to secure.
- By wrapping one side with Jute string, the wood blocks will sit slightly off. I added a half loop of Jute string to the opposite side, on the bottom of the wood. This makes the wood blocks sit level.
- This is the top view of the wood blocks, showing the slightly messy look of the glued ends of the ribbon and string. This will be covered by the flower and leaves.
- Snip one sunflower from the floral pick, leaving a short piece of stem. Gauge the best placement for the flower and glue the stem to the top of the ribbon and string. Glue two bunches of leaves behind the flower, covering up the glued ends of the ribbon and string.
- Hot glue the Bee button to the front of the wood blocks.
Notes
Use any font you would like. I used Verdena.
You can use a Silhoutte machine if you have that for the vinyl cutting.
Feel free to use any color to pain the wooden blocks.
Let me know how you like this Cricut stacked book craft! Bee kind craft that makes a great gift, home decor piece and more.

If you make this be kind gift book set let me know in the comments. Let me know how you like this honey bee decor craft!
